Brown tips on your peace lily? Learn 15 causes—water, salts, humidity, light—and step-by-step fixes to bring back glossy, healthy leaves.

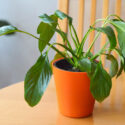
Peace lilies are gorgeous, glossy, and just a little dramatic. When their leaf tips turn brown, they’re telling you something about water, salts, humidity, or heat. The good news: tip burn is one of the easiest issues to diagnose and fix. Below you’ll find the most common causes, how to spot them fast, and exactly what to do so your plant’s edges stay smooth and green.

Brown tips usually come from dry air (low humidity), minerals/additives in tap water (hard water, fluoride, chlorine, or sodium from softeners), and
salt buildup from fertilizer. Secondary culprits: underwatering/inconsistent watering, direct sun/heat, drafts,
root stress (overwatering, poor drainage, rootbound), and harsh leaf sprays. Start by switching to filtered/distilled/rainwater, raising humidity, and flushing
the soil to remove salts.
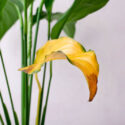
Edges dehydrate first. In winter or AC season, indoor air often drops under 30% RH—prime tip-scorch territory.
Minerals and additives (including fluoride/chlorine) accumulate and desiccate leaf tips.
Ion-exchange softeners replace calcium/magnesium with sodium—which is rough on roots and leaf margins.
Excess nutrients draw water out of leaf tips (osmotic burn) and build crust in the pot.
When the mix dries hard between waterings, leaf tips are the first to show stress.
Constantly wet roots can’t breathe; damaged roots struggle to deliver water evenly to leaves, causing marginal browning.
A tight, peat-heavy or exhausted mix traps water/salts around roots.
When roots circle, soil volume shrinks and dries rapidly; salts concentrate sooner at leaf tips.
Hot rays through glass and heat from radiators can scorch tender margins.
Cold blasts at doors/windows or hot HVAC streams desiccate tips and edges.
If the mix dried rock-hard, water can bypass the rootball, leaving leaf tips thirsty even after “watering.”
Hidden standing water in sleeve pots keeps salts and moisture trapped around roots.
Oily sprays and some cleaners can clog pores or burn edges under light.
Sap-sucking pests weaken leaf tissue; fungal/bacterial spots can necrose to brown margins.
Older leaves retire at the tips first.
Use filtered, distilled, or rainwater. Avoid softened water.
Every 2–3 months (or after overfeeding), run 2–3x the pot volume of clean water through to leach salts.
im for 40–60%+. Use a pebble tray or room humidifier; avoid constant strong airflow on leaves.
Water when the top inch is dry; soak thoroughly; drain completely—no standing water in saucers.
With clean scissors, snip just the brown portion, following the leaf’s natural shape.
Repot into a well-draining blend (2 parts houseplant mix + 1 part fine bark + 1 part perlite/pumice).
Keep in bright, indirect light; filter harsh sun with a sheer curtain.
In spring/summer, fertilize every 4–6 weeks at half strength; skip in fall/winter.
Inspect undersides and stems; treat with insecticidal soap or neem weekly until clear.
*Ranges vary by pot size, mix, humidity, and season. Always confirm by feeling the top inch of soil.
Why this section matters: the potting medium controls how water and salts move around the roots. A heavy or exhausted mix holds water—and salts—too long, which mimics overwatering and can progress to root rot. Compaction reduces air spaces, while a bone-dry, peat-heavy core becomes hydrophobic and resists rewetting. Both scenarios push brown tips.
Tip: After potting, water through once more 15–30 minutes later—this settles channels and eliminates dry pockets.
Usually minerals/salts in water, low humidity, or inconsistent watering. Less often it’s heat/sun, overwatering/poor drainage, or leaf sprays. Switch to distilled/RO/rainwater, raise humidity to 40–60%, flush salts, and keep soil evenly moist.
Trim only the brown tissue, then: change to gentle water, flush the pot (2–3× volume), raise humidity, and stabilize bright indirect light and steady watering. New leaves should emerge clean.
Yes. Use clean scissors and follow the natural outline of the leaf, trimming only the brown portion. This doesn’t harm the plant and improves appearance immediately.
No. Damaged tissue won’t re-green. Focus on prevention: better water quality, steady moisture, moderate humidity, and gentle feeding.
Every 2–3 months in active growth, or anytime you notice white crust on the soil/pot rim or increased tip burn—use 2–3x the pot’s volume of clean water.
No. It may dissipate chlorine, but it won’t remove fluoride, hard-water minerals, or chloramine (used by many utilities). Use distilled, RO, or rainwater instead.
Brown tips are your peace lily’s way of saying “less salts, more humidity, and please keep the water gentle.” Switch to filtered/distilled/rainwater, flush salts, raise humidity, stabilize light and temperature, and keep a steady watering rhythm in a well-draining mix. Do those basics, and the next leaves will emerge glossy and tip-top.
| Hardiness |
11 - 12 |
|---|---|
| Plant Type | Houseplants, Perennials |
| Plant Family | Araceae |
| Common names | Peace Lily |
| Exposure | Partial Sun |
| Season of Interest | Spring (Early, Mid, Late), Summer (Early, Mid, Late), Fall, Winter |
| Height | 1' - 4' (30cm - 120cm) |
| Spread | 1' - 4' (30cm - 120cm) |
| Maintenance | Low |
| Water Needs | Average |
| Soil Type | Clay, Loam, Sand |
| Soil pH | Acid, Alkaline, Neutral |
| Soil Drainage | Moist but Well-Drained |
| Characteristics | Showy, Evergreen |
Create a membership account to save your garden designs and to view them on any device.
Becoming a contributing member of Gardenia is easy and can be done in just a few minutes. If you provide us with your name, email address and the payment of a modest $25 annual membership fee, you will become a full member, enabling you to design and save up to 25 of your garden design ideas.
Join now and start creating your dream garden!